
Adding a little garden sulfur to alkaline ground corrects soil pH to restore deep green foliage and safeguard budding blooms on -loving specimens like the October Magic Ivory Camellia. Scientifically classified as Camellia sasanqua ‘Green S99-016’, this evergreen shrub from the Southern Living Plant Collection produces fragrant, creamy white double blooms from September through October. Bred in Mobile, Alabama by plant breeder Bobby Green, the variety is celebrated for early flowering, disease resilience, and a compact, upright stature. Reaching a mature height of six to eight feet and spreading five to seven feet wide, this vigorous specimen works exceptionally well as a privacy screen, foundation hedge, or shade border accent. Ensuring the plant reaches its full ornamental potential requires balancing soil chemistry, light exposure, and seasonal irrigation.
Balancing Soil Chemistry to Prevent Chlorosis
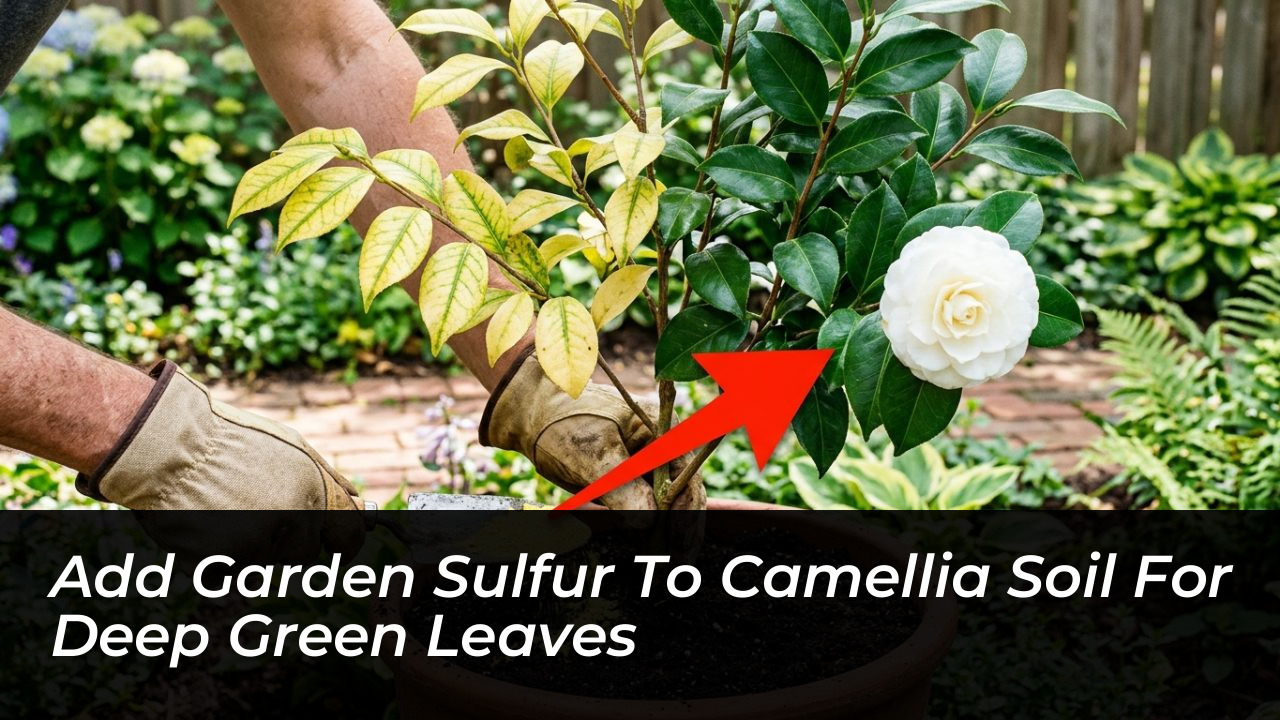
One common misconception among home gardeners is that pale or yellowing camellia foliage indicates an urgent need for multi-purpose nitrogen fertilizer. Applying standard fertilizer to a struggling shrub often backfires by stimulating weak vegetative shoots at the expense of root stability and bud set. In reality, yellow leaves framed by contrasting dark green veins indicate chlorosis, a condition driven by alkaline or neutral soil that blocks the plant from absorbing iron.
The October Magic Ivory Camellia requires loose, rich, well-draining soil with a slightly acidic pH between 5.5 and 6.5. Yellowing leaves with prominent green veins signal an iron uptake failure caused by high soil pH, not an inherent lack of nutrients in the dirt. Incorporating a small amount of garden sulfur into the surrounding dirt gradually brings high pH levels down to the target range. If planting beds contain heavy clay or sit in low spots where standing water pools, amend the site thoroughly with organic compost or construct raised mounds to protect shallow feeder roots from rot.
Key Cultivation and Structural Profile
Understanding the exact environmental baseline for this cultivar ensures steady growth and abundant seasonal displays.
- Mature Dimensions: 6 to 8 feet high; 5 to 7 feet wide
- USDA Hardiness Zones: Zones 7 through 9 (cold-hardy to 0°F)
- Bloom Period and Type: September to October; fully double white flowers
- Sunlight Preference: Filtered light to partial shade; tolerates full sun
- Optimal Soil pH: Slightly acidic (5.5 to 6.5)
- Foliage and Habit: Evergreen; upright and dense branching
- Toxicity Level: Non-toxic to humans, dogs, and cats
Step-by-Step Planting in Garden Beds
Potted shrubs establish most reliably when set into the ground during late fall or early spring. Because camellia root structures remain shallow throughout their lifespan, site selection must minimize root competition from large adjacent trees.
- Hydrate thoroughly: Soak the container root ball with water before planting to keep root fibers resilient during handling.
- Excavate the site: Dig a hole two to three times wider than the root ball, providing ample loose soil for lateral root expansion.
- Free root edges: Slide the shrub carefully from the nursery container and gently tease apart outward-facing roots.
- Position the crown: Place the shrub so the root collar-the junction where branches meet the roots-rests slightly above the surrounding soil level.
- Backfill natively: Refill the hole using the original native soil rather than imported bagged topsoil, pressing gently to remove air pockets.
- Topdress and water: Water deeply and spread a one- to two-inch layer of organic mulch across the root zone, keeping the mulch from touching the trunk.
Managing Water Levels to Stop Bud Drop
Gardeners frequently worry when their camellias drop unopened flower buds in late summer or early autumn. A modest amount of bud drop represents normal self-thinning, as healthy plants regularly set more buds than the branches can sustain. Mass premature shedding, however, points directly to environmental water stress.
Camellias form flower buds during mid-summer heat, a window where supplemental irrigation is vital during extended dry spells. Conversely, soggy roots from poor drainage suffocate the root system, triggering petal loss and fungal decay. Consistent moisture during mid-summer bud set prevents the dehydration shocks that trigger widespread autumn flower drop. In addition to water regulation, light management plays a crucial role in flowering volume. The shrub flourishes best in partial shade or dappled sunlight, particularly where afternoon shade shields foliage from harsh southern or western sun exposure that causes leaf sunscald.
Seasonal Maintenance, Pruning, and Protection
The American Camellia Society recommends applying fertilizer across three specific seasonal windows: early March, early May, and early July. Use an -forming azalea or camellia fertilizer tailored to label directions, providing young shrubs with adequate nitrogen to support structural canopy development. Pruning should occur strictly in late winter or early spring right after flowering finishes. Trimming later in spring or summer removes newly developing flower buds.
Thin out interior crossing limbs to boost airflow and reduce fungal issues like petal blight, root rot, or canker disease. For tea scale or aphid outbreaks, spray horticultural oil directly onto affected foliage to eliminate the pests and prevent dark sooty mold. Gardeners in the Upper South should shield shrubs from drying winter winds, using breathable horticultural fleece or protective blankets whenever temperatures approach 0°F. Note that the October Magic Ivory Camellia is a patented cultivar, meaning vegetative propagation is legally restricted.
Proper site prep and consistent moisture during the summer months will reward your garden with fragrant, pristine blooms every single autumn. Checking your soil acidity with a basic test kit is the easiest way to catch iron deficiency before leaf chlorosis spreads.
Leave your thoughts in the comments below and share how your camellias are performing this season!